DIY Reach in Closet Makeover Reveal with IKEA Kallax
Who is ready to get organized? If you know me at all you know that organization is a must in my life because for me, mess equals stress. While this is not my first time tackling a closet, it was my first time tackling a guest room closet and I set out to find an affordable option that met my needs while still being easy to maintain and keep organized. The good news is I found a great way to get an organized closet with this IKEA hack. So let me walk you through how I did this DIY Reach in Closet Makeover with IKEA Kallax. Trust me, you are going to want to try this!

This post contains affiliate links at no cost to you. Please see my full disclosure policies for more information.
Guest Room IKEA Kallax Closet Makeover
This closet makeover was a long time coming! Originally this closet had some awkwardly placed wire shelving which I removed years ago. It also had the standard builder grade top shelf and closet rod. This was fine for a while but honestly wasted a ton of space. Hanging space was limited and there wasn’t anywhere to put small items, let alone organize them. So this closet became a dumping ground for a lot of random items I really needed to purge and donate. This is what the closet looked like before I started this project.


Choosing a Closet System
While this is not my first closet transformation, it was definitely a different approach since it is a guest room closet. I have tackled my small walk-in closet, Barry’s reach in closet, the linen closet, and the coat closet. For each custom closet I used IKEA hacks! Time after time I come back to IKEA because of the affordability.
If you have ever priced a whole closet system you know they are normally thousands of dollars and some of the more affordable options at The Container Store are still wire shelves despite the hefty price tag. When I priced the master closet makeover these expensive wire options actually took storage away because they were not fully customizable.
I have also tried out modular closet systems from other big box retailers. In fact, before my closet makeover I had several shelving units and shoe shelves that moved into this closet after my upgrade. While they were a temporary solution, they lacked the quality I was really after and didn’t truly solve my biggest organization problems.
If you are working on designing your dream closet, check out my tips here. The biggest piece of advice I have no matter what closet you are tackling is do not lie to yourself about your specific needs. Otherwise you will just end up with a more expensive unorganized closet.
IKEA Closet Options
IKEA has several great closet options. Their most popular is the PAX units. I have used these twice now and have zero regrets! They are a great option and are VERY customizable but they can add up quickly. Since this particular closet is in the guest room and is really just overflow storage, I couldn’t justify spending the money on the IKEA Pax system here. However, I did use the Pax in my closet and Barry’s. You can also use the Pax planner to build your closet and make a shopping list before you go to the store. You can even place an online order for pickup!
The next option is the Aurdal system. This is a newer option and little less expensive than the Pax system. I actually considered going this route but the center towers would only work if I used shelves and no drawers. Since I was really lacking storage for smaller items, I didn’t feel like that fit my needs. However I did decide to use the expandable closet rods from this system.
The third option at IKEA is the Boaxel system. This is a wall mounted system very similar to Elfa at the Container store but much more affordable. I personally wanted a more custom built in look and did not consider this one at all.
The last option at IKEA is the custom hack. I have gone this route several times, once on my linen closet and once on my coat closet when I reconfigured the existing shelves and hanging space and used the Trofast for small storage. I did consider the Trofast again but drawers in this closet were not the right fit for this closet configuration. But there are hundreds of products at IKEA that can solve your organizational needs with a little bit of creativity.
Why I chose IKEA Kallax
As I mentioned above, I was up against a few obstacles with this closet. Let me explain.
This is a fairly average reach in closet measuring 80 1/2 inches wide, 23 3/4 inches deep and 92 1/2 inches tall with a door opening of 58×80 inches. One of the biggest issues with this closet was the amount of space being wasted between the hanging clothes and the floor and the top of the closet. Another issue was there wasn’t a good place for smaller items. Since this is a guest closet, not a lot of clothes are actually stored in here, but rather smaller random items.
Another issue was the “wings” on the sides. In order to allow clearance to actually get items in and out, the depth of any shelving system was limited and I also had to work around the sliding closet doors. If your closet has French doors, you have a little more freedom with options because you don’t have to worry about clearing each side of the door opening like I do.
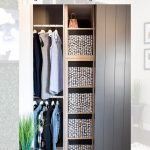
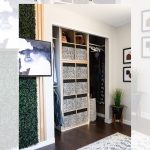
Because of all of this I decided two stacked Kallax units with storage bins would be the best option in the middle and I chose to do three sections of hanging clothes. On the left side of the closet I did two rows of shorter hanging and on the right side I did one row for long hanging clothes.

This solution allows plenty of hanging space but still gives me ample room for other items on the shelves or in the bins. I can use the open shelves for folded clothes, hats, purses, or even shoe storage. Or I can use the bins for really anything! These are the same bins I used in the linen closet for sheets and are very spacious! They would be perfect for PJs, socks, underwear, swim suits, small purses, gym clothes, or even scarfs.
You could also use these bins for things other than clothes. They could be used for toy storage, games, or books, for kids’ closets. If you have teenagers they would work well for beauty products, hair tools, or other toiletries. They would also be great for craft supplies if you are doing a closet in a flex room or office. No matter what type of closet you are doing, the Kallax and Drona bins offer so much storage space!
DIY Kallax Reach In Closet Material List
1 Eight Cube Kallax Unit
1 Four Cube Kallax Unit
3 Aurdal Expandable Closet Rods
10 Drona Storage Bins
3 Pine Project Panels
1 1x4x8 Pine Board
Corner Clamps
Drill & Driver
Miter Saw
Orbital Sander
Mini Circular Saw
Nail Gun
Quick Grip Clamps
Center Scale Tape Measure
3/4 inch screws
Drywall Anchors
1 5/8 Trim Screws
Paint
Step 1 – Gather your materials
The first thing I did was gather all my materials. I highly suggest you do this before you demo your existing closet setup in case any of the materials are out of stock. If you do not live close to an IKEA, I also recommend you place an online order for pickup. This way you do not make any unnecessary trips to your store. Trust me, I have learned this the hard way. The first four items are from IKEA and the rest I either already had on hand or I picked up at my local Home Depot.
Step 2 – Clear out the current closet
Before you can get started on your new closet makeover you will need to clear out the existing closet. This was my least favorite part because I started with a very messy closet and it stressed me out!

Step 3 – Demo the whole thing
Before you get too excited about demo day, keep in mind this is not HGTV and you actually have to clean up the mess you make, haha! You can recycle some of the wood you are taking out to save money as well. I was careful not damage the existing shelf at the top of the closet because I have plans to use this piece of wood on a future project. I also knew I would likely be able to reuse the pine boards the shelf was sitting on as supports for the new closet rods. So make sure you salvage some of that scrap wood.

Step 4 – Paint and patch the walls
Once the entire space is cleared out you will likely have holes to patch and areas that are not painted. While this step isn’t required, I think it’s a good idea. The way I see it is, I don’t want a brand new closet with holes in the walls and a bad paint job. So I put in the extra effort and patched the holes and gave the entire closet a fresh coat of paint. I used leftover paint I had on hand and painted the walls and ceiling. You could also use white paint or a bold wallpaper but I was trying use up items I already had.

Step 5 – Assemble IKEA Kallax units
Next you will need to assemble the IKEA Kallax units. This took about an hour to put both of them together. I assembled these in front of my first Kallax hack in the bunk room where I have more floor space.

Step 6 – Cut the wood for the outside box
I used three pine 1x16x8s to create a box to go around the Kallax units. I did this because the Kallax units are hollow on the inside and I didn’t think they would be able to hold the weight of the closet rods on their own.

I cut the boards down to size with my mini circular saw and a scrap 2×4 as a guide.

Step 7 – Sand the wood
After cutting my pieces down I used my orbital sander to smooth out all the edges and surfaces.

Step 8 – Paint the wood
I was going for a two tone look for my closet so I painted the pieces for the outside box white.

Step 9 – Assemble the box
I am not going to lie, I made a large miss calculation on this part. I fully assembled the box and then realized it was too tall to make the turn to fit in the room. So I had to disassemble it in the upstairs hallway and then assemble it in place in the closet. Make sure you measure before you start this step. If you have any tight corners your box cannot be taller than the opening of the door to the room or the closet. If it is you will need to build it in place as I did.
Because I built the box in the garage, I will show you what that looked like. This did help when I had to build it in place because all of the holes were pre-drilled.

I started off by laying out the box the Kallax would sit in. I used my corner clamps to make it square and my long clamps to keep the box tight while I pre-drilled and screwed the box together. Because this is thinner wood I used some trim screws I had on hand from another project.

Step 10 – Installing the Closet Organizer
If you have the same type of reach in closet I do, the Kallax units must be installed in the middle otherwise you will not be able to add bins because they will not clear the wings on the side of the closet. To make sure I positioned mine in the middle, I used my center scale tape measure and marked the center of the closet opening with a piece of tape on the floor.

Then I placed the bottom base of the outer box on the floor and brought in the Kallax units and stacked them. The rest of the box was then built around the Kallax units.

Step 11 – Anchor the Kallax to the wall
Each Kallax unit comes with brackets so you can anchor them to the wall. I highly recommend you do this to prevent the units from tipping over. Because I did not have any wall studs where these needed to go, I used drywall anchors and screws to attach two brackets to the wall for each Kallax unit.

Step 12 – Installing the closet Rods
Unfortunately the sides of my closet walls did not have studs where I needed them and I had to add supports for the closet rods. I used the pine pieces of wood I pulled out of the closet when I demoed it.
I cut three pieces down to the size of the depth of the closet. I did this with my miter saw.

Then I painted them the same color as the closet walls so they would blend in.

I attached them to the studs with my nail gun and two inch brad nails. I nailed them in each corner where I knew they would hit the studs in the closet framing and in the middle where the other stud was. Note, for this to hold, it must go into studs.

Then I attached each of the adjustable closet rods to the box around the Kallax unit and into the side supports of the closet. These particular closet rods are adjustable and were the perfect solution for this closet at an affordable price.

Step 13 – Add the bins
IKEA makes storage bins that are specifically designed to go inside the Kallax cubbies. These are much larger than ordinary bins and hold a lot! I used them in the linen closet and absolutely love them! So naturally I decided to use them again. They come in several different colors but this black and white pattern is my favorite.

Step 14 – Enjoy!
Sit back and enjoy your new custom closet and all the storage solutions it has to offer! When I went to fill up all my bins I was actually surprised at how much extra space I had. I actually have four bins that are empty!

What would I do differently?
Besides measuring the doorway? Haha! I am honestly not sure. I love how this spare room closet turned out and the how much space I gained by utilizing the entire closet. It was an affordable small closet makeover and didn’t take a lot of time to put together. It’s the perfect storage solution for a guest closet, kids’ rooms, or even a primary closet if you are on a budget.
Frequently Asked Questions
Do I have to use wood to frame out the Kallax?
The reason I framed out the Kallax in real wood was so I would have something strong to attach my closet rods to. The inside of an IKEA Kallax is really just cardboard much like a hollow core door, so I was not confident the closet rods would hold without the extra wood. I do not advise skipping the wood as I do not think it will be sturdy enough. This is what the inside of a hollow core door looks like (from another project I did).

If you do an internet search for inside of IKEA Kallax you will see where others have opened one up and it looks the same. So unless you plan to hang doll clothes, you probably should not skip it.
Do I need to secure this to the wall?
Yes! The Kallax pieces need to be secured to the back wall to prevent them from falling or tipping over.
Did you attach the two Kallax units together?
No, but you definitely could. Because I secured the both to the wall once they were stacked, I didn’t think it was necessary. You could add a strip of Velcro in between them like I did in the office or glue if you want something more permanent.
Does the Kallax unit have to go in the middle?
Honestly, this will depend on your closet walls and closet doors. For my closet, the middle was the only place I could put them and still have easy access to pull the storage bins in and out since the side walls extend 11 inches into my opening. Also I needed to make sure the doors would not block part of my access since they are sliding doors and not French doors.
Can I use one Kallax instead of two?
Absolutely! I wanted the extra organization bins since I have a lot of small items I store in here so I did two. Just note you may only be able to have two sections for hanging clothes then.
What is the size of this closet?
My closet is 80 1/2 L x 23 3/4 D x 92 1/2 T with a 58 inch opening. The side wings are 11 inches.
How much did this cost?
This cost me $325 before tax. The Kallax units were $148 total. I caught the Drona bins on sale for $4.99 and used 10 of them for a total of $50. The Aurdal closet rods were $10 each for a total of $30. And I spent $96 on the wood panels for the sides.
Do the Kallax units come in other colors?
They do! They come in white, dark brown, gray, and the color I used. I liked the look of the natural wood tones with the rest of this room, but you can choose any color you like!

If you are looking for a cost effective closet solution that has a lot of space, you need to try this diy closet makeover on your own closet! It’s a fairly simple diy project and will leave you with an organized space that is maintainable.

And make sure you check out all the behind the scenes on my Instagram story highlight!

Looking for more closet ideas? Check out my other closet makeovers here!
If you enjoyed this blog post, DIY Reach in Closet Makeover Reveal with IKEA Kallax, please share it with your friends on Facebook or hover over an image and save to Pinterest! And if you don’t already follow me on social media (Instagram, Pinterest, TikTok, or Facebook) I would love for us to be friends!

Love new ideas and projects? Subscribe to receive DIY and design inspiration delivered straight to your inbox! Plus you will receive access to all my free printables! These are only available to my awesome subscribers as my way of thanking you for your continued support!

This post, DIY Reach in Closet Makeover Reveal with IKEA Kallax, appeared first on Garrison Street Design Studio.