
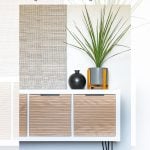
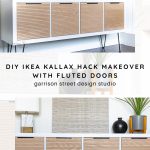
DIY IKEA Kallax Hack Makeover with Fluted Doors
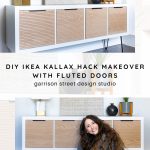
Week 7 of the One Room Challenge is here and we are dangerously close to the finish line. This week I tackled the dresser situation or lack there of and decided to go with this IKEA Kallax Hack that has a modern look while still providing valuable storage space. If you saw my Insta stories, you know this DIY project was a bit of a detour for me. Seems to be a common theme here, huh? Regardless, I couldn’t be happier with how this IKEA Kallax DIY fills this long wall in a stylish wall and doesn’t feel too tall next to the bunk beds. If you have missed any of the progress so far, check out week one, week two, week three, week four, and week five first. While this IKEA hack was not my original plan, I think it works even better. Let me share my detailed tutorial on how I did it 😉

This post contains affiliate links. For more information, please see my policies.
IKEA Kallax Hack
Let me give you a little background on this weeks IKEA furniture project. I originally planned to hack an IKEA dresser I had on hand, (because you know I love hacking IKEA items), however, when I moved it into the room, the size just wasn’t right. It was too tall next to the bunk beds and too deep. So I went in search of something with a slimmer footprint. Even though you all voted I should build something from scratch on Instagram, I just didn’t have time for that. Luckily, my good Swedish friend came to the rescue yet again with the IKEA Kallax unit. Just don’t ask Barry how many times he has been to IKEA in the last month, haha!
Supplies
IKEA Kallax
4 Cubbie IKEA Kallax
Pole Wrap
Miter Saw
10 inch Hairpin Legs
6 inch Black Finger Pulls
Wood Glue
Step 1 – Go to IKEA
Between this and Barry’s PAX closet, we have arguably been to IKEA too many times. However, I think it has been worth it. Barry might disagree. Either way, I highly recommend checking the stock levels of IKEA products before you go and if your store offers it, buy online and just go pick it up. With all the supply shortages the Denver inventory has definitely been hit or miss. For this DIY project I chose to use the four cubbie version of the Kallax units but you could use the others as well if you need a larger storage unit.

Step 2 – Build the IKEA Kallax
I know many people do not enjoy this step, but the IKEA Kallax shelf unit was one of the easiest IKEA builds I have ever done.

This piece can be used vertically or horizontally. Based on the space I was filing, I turned it on its side and used it horizontally.

Step 3 – Add Custom Legs
I wanted a more custom furniture look and I needed this to be a pretty specific height, so I added some hairpin legs. These are my go to legs that I used for my dining room benches and the console table in the living room. They are affordable, easy to install, and add a lot of style to an otherwise bland piece of furniture. I measured, marked, and predrilled the holes for these.

Step 4 – Pole Wrap
If this looks familiar, that’s because I used it a few weeks ago on my IKEA Rast hack as well. When I shared this last time I received tons of questions about it! Pole wrap is exactly what it sounds like. It is meant to wrap poles in basements. Think 70s/80s style. You know I love thinking outside the box so it should be no surprise that I am now addicted to this mid century fluted wood! It really is a great way to dress up a piece of furniture. I used the remaining pole wrap I had and positioned it horizontally again.

You will need to cut the pole wrap to fit the size of the Kallax cubbie doors. I used my miter saw with a fine finish blade to make the cross cuts and a utility knife to cut between the pieces of wood. You can also use the pole wrap vertically but you will have more cuts.

Full disclosure, this is 16 inches wide and my 12 inch miter saw doesn’t make cuts that wide so I had to flip it over and make a second pass to cut all the way through when I was cutting it for the Rast Hack. Since I was working with the leftover pole wrap this time, my pieces were smaller and I did not have to make two passes. You can also roll it up and cut it rolled if you have a smaller saw.
Step 5 – Add Glue to Door Fronts
With the pole wrap cut to size, I used wood glue to attach it to the IKEA Kallax doors. I spread the glue almost to the edges with a dollar store paint brush. I chose the wood glue because of it’s strength, but I didn’t want it to set too fast so I would have time to position the pole wrap just right. If you choose to run the pole wrap horizontally, you will want to make sure all the grooves line up between each door as well.

Step 6 – Let the Glue Dry
I let mine set overnight and used weights to keep it in place. Be very careful that you don’t have any glue leaks before you let it dry. They are challenging to get off if they harden all the way.

Step 7 – Add Hardware
Once all the glue was dry, I added new handles instead of the knobs that come with the doors. I loved the modern look of the simple black finger pulls I used on the IKEA Rast. Since this is not where the original holes were, I had to drill new ones. I first found the center of each door and measured to make sure each handle was the same distance to each edge. I added my handles to the top edge so they all looked the same regardless of how the door opens.

Step 8 – Assemble the Kallax Door Inserts
I followed the included instructions for this step and chose to have each of the two doors on the end open outward. I will admit, I used the drill to pre-drill for the hinges because it was easier.

Even though this is not what I originally imagined for this particular space, I like it even more! The pole wrap takes these IKEA shelves to the next level and it is the perfect size and still offers plenty of storage.


Don’t forget, There is only ONE week left, and the final reveal is next Thursday! I am so excited and so nervous at the same time! Did I mention I still have to build a ladder for the bunk beds?! Yep! If you want to catch the remaining behind the scenes, head over to Instagram and watch my stories. There will be a lot happening this week! I have also saved the video from this project to the highlight IKEA Kallax Hack.

If you enjoyed this post, IKEA Kallax Hack, please share it on Facebook or hover over an image and save to Pinterest! And if you don’t already follow me on Instagram, TikTok, Pinterest, or Facebook, I would love for us to be friends! Also, make sure you don’t miss any of the progress and sign up here to get notifications delivered straight to your inbox. This final week is going to be a wild ride!
Don’t forget to stop by the One Room Challenge to check out all the featured designers and other guest participants and give them some encouragement. I am sure they are feeling just as stressed as I am right now!


This post, DIY IKEA Kallax Hack Makeover with Fluted Doors appeared first on Garrison Street Design Studio.

That pole wrap is magic! Can’t wait to see your final reveal next week and the ladder you’re building for the bunk bed!
Thanks Vicki! The pole wrap is like magic! It’s been a busy week but I am so excited for the reveal!
Could you paint the ikea piece or would ir not hold up? I want A black one
I personally have never painted a piece of IKEA furniture that wasn’t raw wood. I have seen others do it, but I cannot attest to how it would hold up. The Kallax does come in a black/brown color that is almost black, so maybe that would be a good option for you.
This is awesome! I have this kallax and am excited to do this project! Did you use 6, 8 or 12 inch hairpin legs?Thanks!
Thank you so much! I used 10 inch hairpin legs.
Thank you!!
Can pole wrap be cut using another method for those without this type of saw?
You can cut pole wrap in between the grooves with a utility knife, but to cut the oak, you will need some sort of saw. I have used both a circular saw and miter saw. I have not tried any other methods.
Hello! When you open the doors, does the added thickness of the pole wrap get in the way and prevent the doors from opening fully?
It can. When I added the pole wrap I was careful not to let it over hang at all.
Hi! Did you put any protective finish on the pole wrap or left ir raw?
I left it raw. But if you are using it in a high traffic area or somewhere it is touched frequently I would put a poly on it 😉
Instead of legs, could this be attached to the wall as a floating shelf?
Yes, IKEA has mounting hardware so the Kallax can be hung on the wall as well.
Do you use Kallax insert with door or just only door? I coulnd’t find the only door.
This is the Kallax insert with the door 😉