
Easy DIY Pedestal Bowl Dollar Tree Project Tutorial
I was really hoping to share our stair makeover this week, but we hit a few snags and they just aren’t done yet. Fingers crossed we have a very productive weekend and I can share them next week! Today, I want to share a super easy and affordable DIY that has been on my list for a while now, a DIY pedestal bowl. These have been trending in all the design catalogs and I have been swooning hard over this pedestal bowl, but being the budget girl that I am, I was sure I could DIY it for less. Now I am going to show you how I made it for $2! Yep! That’s not a typo 😉

This post contains affiliate links. For more information, please see my policies.
This all started with a trip to the Dollar Tree to get some Mambas. If you have never had them, they are so good! I would describe them as a cross between a Starburst and Laughy Taffy. Anyway, I happened to see these terrarium dishes which I knew were the perfect fit for this project. Another stroll down the dish aisle and I had the perfect glass bowl base. Each component was only $1!
DIY Pedestal Bowl
Step 1 – Pick your components
As I mentioned above, I found the top and the bottom for my pedestal bowl at the Dollar Tree. Thrift stores could also be a good option if you do not have a Dollar Tree. For the base, the glass bowl seemed like just the right height. For the top, I wanted something relatively shallow and the terrarium was just the right size.

Step 2 – Spray paint the pieces
I chose to paint my pieces prior to attaching them in order to get good coverage. I used my go to white spray paint that I already had on hand from all my fottery projects. You can use any color you like, but I chose white so it would tie in seamlessly with the rest of our decor.

Step 3 – Attach the pedestal bowl
I used Gorilla construction adhesive because we have it on hand for our stair project and it has always worked well for me in the past. I have had some bad experiences with my glue gun and the terrarium is plastic and I didn’t want it to melt.

I applied a generous amount to the center of the bowl upside down and spread it around a little. Be careful not to use too much so the glue doesn’t leak out.

Let the glue set for a while before adding any decor, like 30 minutes.
Step 4 – Add decor items
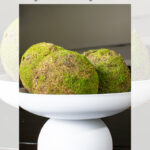
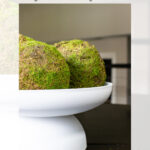
Once the glue is set, add whatever decor items you wish. I chose some oversized moss balls, but faux flowers, succulents, or faux fruit would all be good options 😉 Since it is spray painted, I don’t recommend using it for food.

See, I told you this was an easy one! The longest part of this project is waiting for the paint to dry!


I am so excited to finally have one of these modern pedestal bowls that I was just not willing to fork out $50 for. It was SO easy to make yet adds a lot of style! Make sure you follow me on Instagram stories to get a sneak peek of the stair makeover and all of the behind the scenes!

If you enjoyed my DIY Pedestal Bowl, please share it on Facebook or hover over an image and save to Pinterest! And if you don’t already follow me on Instagram, Pinterest, or Facebook, I would love for us to be friends!

Love new ideas and projects? Subscribe to receive DIY and design inspiration delivered straight to your inbox! Plus you will receive access to all my free printables! These are only available to my awesome subscribers as my way of thanking you for your continued support!

This post, DIY Pedestal Bowl, appeared first on Garrison Street Design Studio.


Oh my goodness this is so cute! Thank you for all the styling inspiration!!!! We are doing some kitchen cabinet refinishing this week & I am trying to plan out how we are going to style the space after. This centerpiece would be so cute!!! Thanks for sharing!