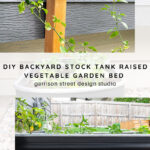
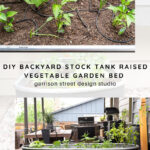
DIY Galvanized Stock Tank Raised Vegetable Garden Bed
Happy summer friends! The first DIY at the top of my outdoor project list this year is a raised garden bed. With inflation and unpredictable supply chains I figured it was time to learn how to grow a vegetable garden just in case. I mean with my black thumb, I am going to need some practice so no time like the present. For a number of reasons I will get into below, I chose to make my garden from a small stock tank. Are you ready to see how I did it?

This post contains affiliate links. For more information, please see my policies.
Before we dive into the how to, let me be clear. I do not expect to grow enough food to stop going to the grocery store. I just want to learn how to successfully grow vegetables and scale up as I get better. Last year I got a jalapeno plant and I didn’t kill it so basically now I think I am a farmer, haha! Not really, but I am going to give it a go and see what happens.
Why a stock tank?
I chose a small stock tank for this project because A) I liked the height to hopefully keep small animals out. B) I liked the idea of the stock tank pool having a twin 🙂 Not to mention, this option didn’t require me to build anything which was a welcomed break after the wine cellar. C) My outdoor space is limited and for the most part already landscaped. So adding garden beds seemed like an after thought. I considered a vertical garden which I may still try as a herb garden, but for now this seemed like an easy way to add a garden to my small space without getting into a large DIY project.
DIY Stock Tank Raised Garden Bed Materials
Small Stock Tank
White Vinegar
Exterior Paint
Drill
Landscape Fabric
River Rock
Garden Soil
Compost
Perlite
Worm Castings
Hose Drip Line
DIY Stock Tank Raised Garden Bed
Step 1 – Get a small stock tank
The first thing you will need is a small stock tank. I chose a six foot oval stock tank for my veggie garden. I wanted to fit as many new plants in my garden space as possible. This may not be the cheapest way to add a garden, but it can still be done with a limited budget. You can usually find these at your local hardware store. But the larger stock tanks, like the one I used for the pool, are only available at farm supply stores.

I recommend picking your stock tank out in person. These smaller tanks are meant to nest inside one another for easier shipping. Because of this, some are a bit smaller than others and do not have as much space. I chose mine in person and picked the largest tank from the bottom. If you choose to do several of these, they could be different sizes if you do not hand pick them.
Step 2 – Prep the stock tank for paint
Painting is a great way to add a focal point to a small backyard and an inexpensive way to personalize with limited space. I regularly get tons of questions on how I painted the pool and I applied the same logic here. I washed it down with water and vinegar first. This breaks down the coating on the galvanized metal and helps the fresh coat of paint adhere.

I removed the branded sticker and the store label as well. These were a little difficult as they leave a sticky residue. Again I used water and vinegar, Windex, rubbing alcohol and a toothbrush to scrub off the residue.
Step 3 – Paint the stock tank garden bed
I used Behr Exterior flat Black paint. Black is the actual color, apparently the naming committee took that day off, haha! I highly recommend using a foam roller and foam brush. The first coat will be very splotchy. Luckily I had warm weather the day I painted but it wasn’t too hot. You can see behind the scenes video in my Instagram story highlight.

In total, I did three coats rolling the larger areas and using the foam brush to get closer to the edges. I purposefully did not paint the top edge. I did not paint the top edge of the pool either. I felt this area of the tank would be touched frequently and rubbed up against the most and didn’t want a lick of paint chipping over time.

Step 4 – Drill drainage holes and remove the drain plug
While I did remove the drainage hole, I didn’t think that would be enough drainage for my garden. I used my drill and a 1/2 inch drill bit to make 8 more holes in the bottom of the tank.

Make sure your battery is fully charged for this part and have an extra on standby if you can.
Step 5 – Add irrigation
This step is definitely optional, but I highly recommend it! If you are like me, watering everyday can easily be forgotten but 100% necessary in the summer months in the western US. We receive very little rainfall. I used to think sprinkler systems were for rich people but here if you don’t have one, you either have artificial turf or no grass. I used this hose drip line and ran it up through the drainage hole in the stock tank. Leave enough slack on top of the tank to add the drip lines to each plant and enough slack on the end to reach your hose.

This hose drip line system attaches to your hose and doesn’t require you to have lawn irrigation. You will likely need a hose splitter as well to make this work, but its the best thing I could some up with on a tight budget. I have also seen people use this to water indoor plants when they go on vacation. I have also seen the plastic bottles method but I have not had much success with it.
Filling the raised garden bed
After hours of reading about gardening and how to make a garden successful, the overwhelming conscience was it all comes down to the soil. Because I live in Colorado, working with the native clay wasn’t an option. It’s dense and doesn’t allow for good drainage. Instead, I chose to layer in multiple components of garden soil, compost, and peat moss for hopefully very nutrient rich soil. I found lots of tips and information from the Beginners Garden with Jill.
Step 6 – Fill it up
I started by adding river rock to the bottom of the stock tank, careful not to cover any of the holes I drilled. I have done this with plant pots as well to help with drainage and had success so I figured it couldn’t hurt. But make sure you use larger rocks and not pea gravel.

Then I laid down weed barrier on top of the rocks. I did this to prevent the soil from settling into the crevasses between the rocks and negating my attempts to add good drainage. As I said above, I have never done this before and my decisions were made based on information I learned from others that made sense to me. Use your best judgement because I have only planted some flower beds with a 50/50 success rate.

Next I added a layer of organic matter (leaves, mulch, sticks etc) that Barry cleaned out of our flower beds before we laid new mulch. I read you can do this to take up space in the garden and save on the amount of soil needed. Because it is organic, it will decompose over time and add nutrients back into the soil. For me, it was the perfect way to take up a little space at the bottom. Will it work? I have no idea.

I then added several bags of garden soil, compost, and peat moss keeping the mix at roughly 1/3 ratio of each. I also mixed in several scoops of perlite and worm castings per each layer mixing the combination as I went. You can see video of this in my Instagram story highlight.

I filled the stock tank within about 4 inches of the top rim. I only had two bags of compost/cow manure left when I was done. Don’t worry, the manure isn’t as gross as it sounds. You would never know it wasn’t soil. The extra bags went into the garden shed to refresh the soil at a later date.

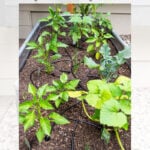
Step 7 – Plant your veggies
Before I planted mine, I laid them out on top of the soil to make sure they would all fit. I may have overfilled my garden but I was so excited to grow my own vegetables! I planted red pepper, green pepper, banana pepper, poblano pepper, chile pepper, spicy bell pepper, zucchini, broccoli, green beans, tomato, tomatillo, onion, and I transplanted my jalapeno plant from last year.

Once I had all my small plants spaced out, I planted them all.

Step 8 – Run the drip line
You want each plant to have a nozzle at the base of the stem. This line slowly drips water. I have mine on a timer (included) that runs every day for 20 minutes. Depending on your climate, this may be too much or too little. So far, this seems to be a good amount for my garden, but remember, we have no humidity and very little rain. As we get later into the growing season, I might be able to scale back, but we will see.

Step 9 – Enjoy your stock tank raised garden bed!
I am hopeful my veggies thrive, but like all things I hear gardening takes practice. If you give it a try, share it on Instagram and tag me 🙂

Additional Items to Consider
Water. When planning your garden make sure you have easy access to water. This part is a chore but definitely necessary to keep your plant babies alive. Some people enjoy manually watering everyday, but that is not me and I chose accordingly. If you can tap into your sprinkler system to water your garden, that is a great option too. While this was possible for me, it was not the best option since my outdoor area is already landscaped.
Space. Not everyone has the same amount of space. Luckily I had the perfect spot to add my stock tank garden next to my dining table. I also considered using cinder blocks, but since I am not an expert gardener, I didn’t want something that permanent in case it doesn’t go well, haha! Not to mention, I love the modern look of a black stock tank. If you do not have the space in your own backyard, you might try a smaller stock tank or utilize vertical space. Many people even do a balcony garden with window boxes or terracotta pots.
Access. It is important to be able to reach all areas of your garden. I can access my garden from three sides. You will not only need to water regularly, but you will need to harvest as your vegetables grow.
Grow what you eat. Most of my garden is peppers, and many hot peppers because that is what we cook with. It will be of no use to you if you grow items you do not enjoy cooking with or eating. I am very excited about the tomatillos to make salsa with! I will share the recipe when I do 😉
Plan for pests. I have already encountered this in the few weeks I have had my garden planted. At first I thought it was a squirrel since the stock tank sits two feet off the ground. BUT I caught it in the act to find it was actually a bunny! I tried a homemade concoction of peppermint oil, apple cider vinegar, and cayenne pepper first, but that didn’t work. So I picked up this deer and rabbit repellent spray and it seems to be an effective way to deter the bunnies so far. I will be sharing updates on this in my Instagram stories so make sure you follow me 😉

Fingers crossed I can keep all of these veggies alive. I am somewhat notorious for having a black thumb, so the odds are not in my favor. But, I was very careful to provide a quality soil mix and irrigation, so two of the major problems areas have been addressed. I am also hopeful because my jalapeno plant that I transplanted already has four new peppers growing!


If you want more backyard ideas make sure you check out my fire pit makeover, backyard makeover with string lights, and these DIY ideas for summer!

If you enjoyed my DIY Stock Tank Raised Garden Bed, please share it on Facebook or hover over an image and save to Pinterest! And if you don’t already follow me on Instagram, Pinterest, or Facebook, I would love for us to be friends!

Love new ideas and projects? Subscribe to receive DIY and design inspiration delivered straight to your inbox! Plus you will receive access to all my free printables! These are only available to my awesome subscribers as my way of thanking you for your continued support!

This post, DIY Stock Tank Raised Garden Bed, appeared first on Garrison Street Design Studio.