DIY Black Vertical Shiplap Accent Wall Tutorial
It’s week 2 of the One Room Challenge and wow, did that go by fast! A lot of big things happened since we talked last week, but I will get to that. Knowing I had a fair amount of construction ahead of me, I started a week early which isn’t against the rules. If you missed week one and the full plan for the guest room makeover, check it out first to see what’s in store. Now let me walk you through this week and my DIY black vertical shiplap accent wall full tutorial.

This post contains affiliate links. For more information, please see my policies.
Before I dive into the main event for this week, let’s talk about the obvious changes in here. The carpet is gone and the new floors are in! The popcorn ceilings got scraped and re-textured and the entire room has been painted. If you want more details on these, head to my Instagram story highlight to see how it all went down, literally.

And here’s a look at the flooring going in.

Planning the Accent Wall
If you remember my design plan from last week you know there is definitely an accent wall going up in here. And if you are a regular, you know I love my accent walls. They are a great way to add visual interest to a room without breaking the bank. This room definitely needed some extra personality so I decided a vertical shiplap accent wall was the easiest way. I chose to do the entire wall the bed goes on.
This wall will be the back drop to the custom bed I am building (coming soon!) By taking the shiplap vertically like I did on my mom’s fireplace, the room will feel taller. Did I mention this is a faux shiplap wall? Yep! I took the easy way out on this one with shiplap paneling! Let me show you how I did it 😉
What is Shiplap?
For those of you new to this design trend, shiplap is a type of wood usually cut into 4-8 inch strips with a tongue and a grove that come together to create a gap about the thickness of a nickel. Shiplap planks were made popular in modern day home design by Joanna Gaines on the TV show Fixer Upper. Traditionally shiplap is laid in horizontal lines and frequently painted white. However, this style is more of a farmhouse look. In recent years many designers have put their own spin on it with more modern patterns like herringbone and vertical planks.
- Difficulty: Beginner friendly
- Cost: About $111
DIY Shiplap Accent Wall Supply List
- Shiplap Paneling
- Brad Nail Gun
- Jig Saw
- Circular Saw
- Clamps
- Stud Finder
- Primer
- Paint
- Wood Filler
- Quarter Round
- Liquid Nails or Construction Adhesive
Step 1: Measure the Wall
The first step is to measure out the whole wall both the length of the wall and the height of your wall. My wall is 143 1/2 inches long which is just shy of 12 feet long. My ceilings are just under 8 feet tall at 92 1/2 inches.

Step 2: Decide on Orientation and Calculate Panels
Decide on the orientation you want to lay the shiplap paneling and calculate how much you need. I laid mine vertically because the vertical lines draw your eyes up and make the ceilings feel taller. I also think vertical shiplap is a bit more modern and horizontal is a more rustic look.
My wall is just under 12 feet long and each panel measures 4×8 feet. Because I chose to go vertical and my ceilings are less than 8 feet tall, I needed 3 panels to cover the length of my wall. Three panels at 4 feet in width equals 12 feet.
If you decide to lay your panels horizontally you will need to stack two panels to cover the height of the ceiling.
Step 3: Prime the Panels
Prime the shiplap panels. They say that they are primed but based on the feel I was skeptical my paint would adhere well. I had leftover primer from the ceiling and walls so I primed my panels. I laid them out on my trusty folding tables in the garage and went to town.

Step 4: Paint the Panels
Paint the shiplap panels. I chose to go dark on my shiplap wall and used SW Iron Ore aka my favorite color. I rolled the surface of the panels first and then let it dry.

Then I came back once it was dry and painted all the nickel gaps in the shiplap with a brush. I needed one more coat with the roller for full coverage and to smooth out any brush strokes.

Step 5: Cut the Panels to Height
Cut the shiplap panels down to size vertically. I had to trim about 4 inches off the bottom of the panels to accommodate my ceiling height. I stacked all three panels on top of each other and lined up the edges so I could cut them at the same time. I used my mini circular saw with a scrap 1×3 as a guide to do this.

Just make sure you pay attention to how close the saw blade is to your work surface. I may or may not have cut the end of my table as well, haha! I swear these folding tables are the true MVPs of my garage!

Once I cut the length to size I dry fit it in the room to make sure it fit. Note: You will want to measure the height of your wall in multiple spots where the panels will be. They will likely vary by a 1/8-1/4 inch. I cut mine based on the shortest length knowing the small gap on the bottom of the wall would be covered by trim.
Step 6: Locate the Wall Studs
Locate your wall studs using a stud finder. You will want to mark these out so you know where to nail your panels in. I marked mine with painter’s tape on the ceiling since the panels would cover any markings on the wall itself.

Step 7: Install the First Panel
Install the first shiplap panel. Because I was only a little bit short of 3 full sheets, I chose not to start in the middle of my wall. With only a half inch needing to be cut off the last panel, I had a very small margin of error and chose to lay my panels left to right just in case. If your wall is not as close to full panels as mine, I highly suggest starting in the middle of your wall and working your way out. I was just fearful I would miss measure the middle and be short at the end.

I attached the shiplap panels to the wall with my brad nailer and 2 inch nails. I started at the top of the wall where I knew I would hit a stud and continued down the sides and bottom. I only nailed in the middle of my panels if I needed to in order to avoid more nail holes I would have to fill later.
Step 8: Cut Out the Electrical Outlets
Cut out the electrical outlets. Luckily I only had one outlet to work around, but of course it was in the middle of a panel. I took my measurements and drew it out on the front of the shiplap and cut it out with my jig saw. I will say having the right tools here is very important! I needed my drill to drill a hole to get my cut started and I definitely could not have done this special cut without my jig saw.

You can see all the details on how I did this in my Instagram stories highlight. If you have any light switches to work around you will have to do those the same way.

And it fit like a glove!
Step 9: Cut the Panels to Width
Cut the shiplap panels down to size horizontally. Unless your wall length is an increment of four feet, you will need to trim the shiplap panels down this way as well. I only had to cut off 1/2 inch on my very last panel, but if you start in the middle as I suggested in step 7, you will be cutting two panels down instead of one.
I cut this one down the same way I cut the length. I used my mini circular saw and a scrap piece of wood and clamps.

Once the panel is cut to size, install in the same manner as step 7.
Step 10: Fill the Nail Holes
Fill the nail holes. This step is why I caution adding too many nails, you have to fill all of the holes. I used my favorite nail filler and a putty knife.

I let the nail filler dry for about 15 minutes and then I came back with a wet rag and wiped off the excess to avoid sanding.

Step 11: Touch Up the Paint
Touch up the paint from the nail holes. I had several touch ups to do so I used an artist brush for the nail holes and a roller to blend my other touch ups. I have also used a foam brush before which works fairly well also.
Step 12: Install Quarter Round
Install quarter round. This step is technically optional but you will likely need some sort of trim or baseboard at the bottom of your wall to hide any small gaps. I have seen some installations with trim around the top and the side of the wall but I preferred to keep it clean and simple.

I painted the quarter round to match the wall color and cut it to length with my miter saw. Because of the small size, I chose to glue it to the shiplap paneling rather than nail it. I taped it in place and added some weights for 24 hours until it was fully dry.
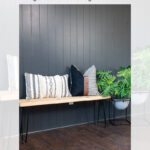
Step 13: Enjoy!
Sit back and enjoy your DIY shiplap wall! I am so happy with how this turned out! It adds so much character to the room and the vertical lines make the ceiling feel so much taller. For just over $100 my guest room has a bold statement wall!

Why Shiplap Paneling?
Shiplap paneling is a newer product I stumbled upon at my local Home Depot and I was instantly intrigued. I have used real shiplap boards in our bedroom, the bunk room, and on my mom’s fireplace but they have definitely become more expensive over the last few years. So when I saw these for only $36.98 a panel, I was all about it!
When comparing the cost of true shiplap to these panels the extra cost was significant. It cost me $110.94 plus tax to do this shiplap wall project with this faux shiplap paneling vs $312.51 for MDF shiplap or $346.17 for pine shiplap. You can also cut your own faux shiplap boards from thin plywood sheets but that is tedious in my opinion. So I went with the affordable option.

Is shiplap paneling easier than shiplap boards?
In my opinion they both come with pros and cons. This was my first time using the shiplap panels but so far I have no regrets using the paneling vs real shiplap. In fact, there is a strong possibility these will make additional appearances in my future designs in different ways 😉
Shiplap paneling pros – It’s more affordable and install feels faster and can be done with less nails.
Shiplap paneling cons – They are large sheets and you need a truck to transport. Cutting is a little more difficult because of their awkward size.
Shiplap boards pros – They are easier to transport and cut down to size.
Shiplap boards cons – They are more expensive and if you use real pine shiplap you have to deal with bowing and warped pieces.

Frequently Asked Questions
Do you have to prime the panels?
That’s a great question. They do say they are primed but I felt like the surface of the panels would not take paint well so I thought it was a good idea. Just know that if you do not prime them you might have to do several more coats of paint. I recommend priming based on my experience.
Can I paint them on the wall?
You definitely can. I pre-painted mine because I was using a dark color and edging along the side walls, ceiling, and floor would have been harder in my opinion. But if you use the same color as your walls, painting in place is probably easier.
Do I need to glue the panels to the wall?
I did not. I don’t usually like to glue anything because it seems so permanent. I secured my panels to the wall studs with brad nails and no glue. So far it seems more than sufficient but time will tell.
Is this project beginner friendly?
Absolutely! This is not a difficult DIY and can done over a weekend. The most difficult part is having the right tools. But if you have a small wall or just want to add a small accent section and can get away without making any cuts it’s even easier!

If you enjoyed this blog post, DIY Black Vertical Shiplap Accent Wall Tutorial, please share it with your friends on Facebook or hover over an image and save to Pinterest! And if you don’t already follow me on social media (Instagram, Pinterest, TikTok, or Facebook) I would love for us to be friends!

Love new ideas and DIY projects? Subscribe to receive DIY and design inspiration delivered straight to your inbox! Plus you will receive access to all my free printables! These are only available to my awesome subscribers as my way of thanking you for your continued support! Plus, you are not going to want to miss these next few weeks. It’s going to be a wild ride!
Don’t forget to stop by the One Room Challenge to check out all the other participants and be prepared to be inspired! I am surrounded by insanely creative and talented interior designers, bloggers, and influencers!


This post, DIY Black Vertical Shiplap Accent Wall Tutorial, appeared first on Garrison Street Design Studio.